Page 1 of 2 12 LastLast
Results 1 to 25 of 28

Thread: INSTALL: Simota Carbon Charger for a 2010 Mazda 3 (2.5L engine)

  1. #1
    Jr Member WingZero_'s Avatar
    Join Date
    Aug 2005
    Posts
    467
    Thanks
    0
    Thanked 0 Times in 0 Posts
    Mentioned
    0 Post(s)
    Tagged
    0 Thread(s)

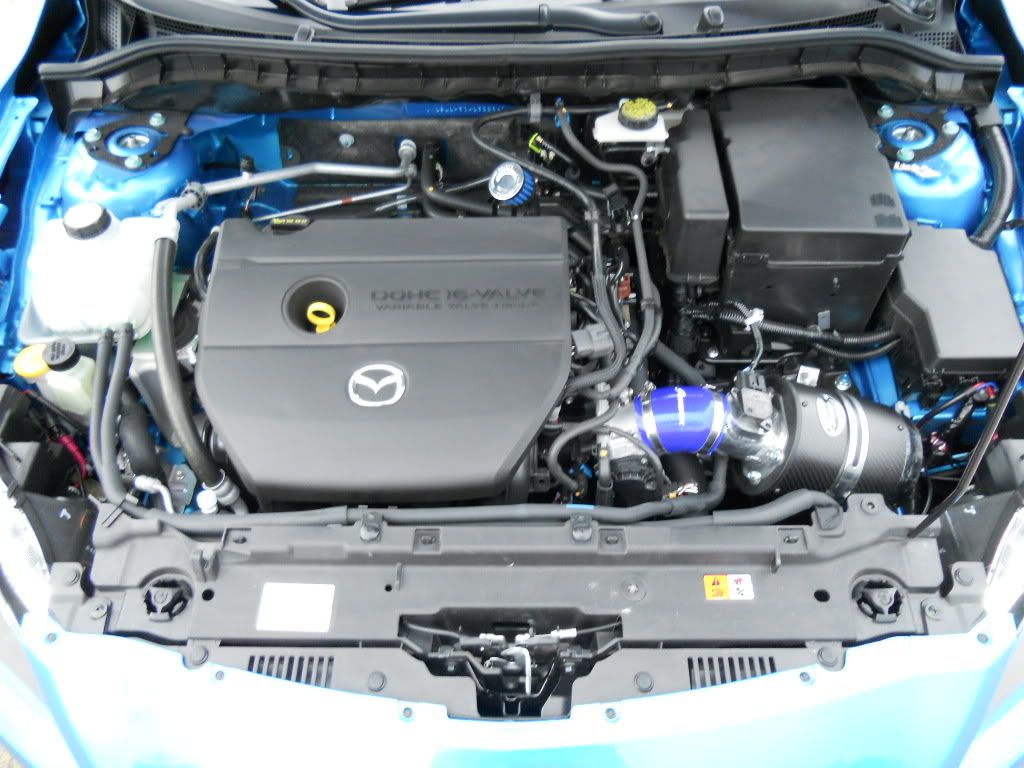
    Default INSTALL: Simota Carbon Charger for a 2010 Mazda 3 (2.5L engine)

    Simota Carbon Charger for a 2010 Mazda 3 (2.5L engine)
    How to install:

    Prep Work.
    The great thing about the 2010 Mazda 3 is there is a lot of open space in the engine bay. So you can completely assemble the intake inside before even thinking about taking apart the stock intake and airbox. This will save some fumble time and protect you from dropping valuable parts. You'll need a Phillips head screwdriver and a flat head.

    Start by standing the filter on end:
    http://i628.photobucket.com/albums/u..._/PIC_0199.jpg

    Place the gasket in the groove:
    http://i628.photobucket.com/albums/u..._/PIC_0200.jpg

    Line the piping up with the gasket, the Simota Logo on the filter should be point straight up, and the air flow sensor location should also be pointing straight up. Use the 4 supplied bolts:

    http://i628.photobucket.com/albums/u..._/PIC_0202.jpg

    Now you put on the rubber elbow, the Simota logo should be face up and the text will be going in the same direction as the Simota logo on the filter:


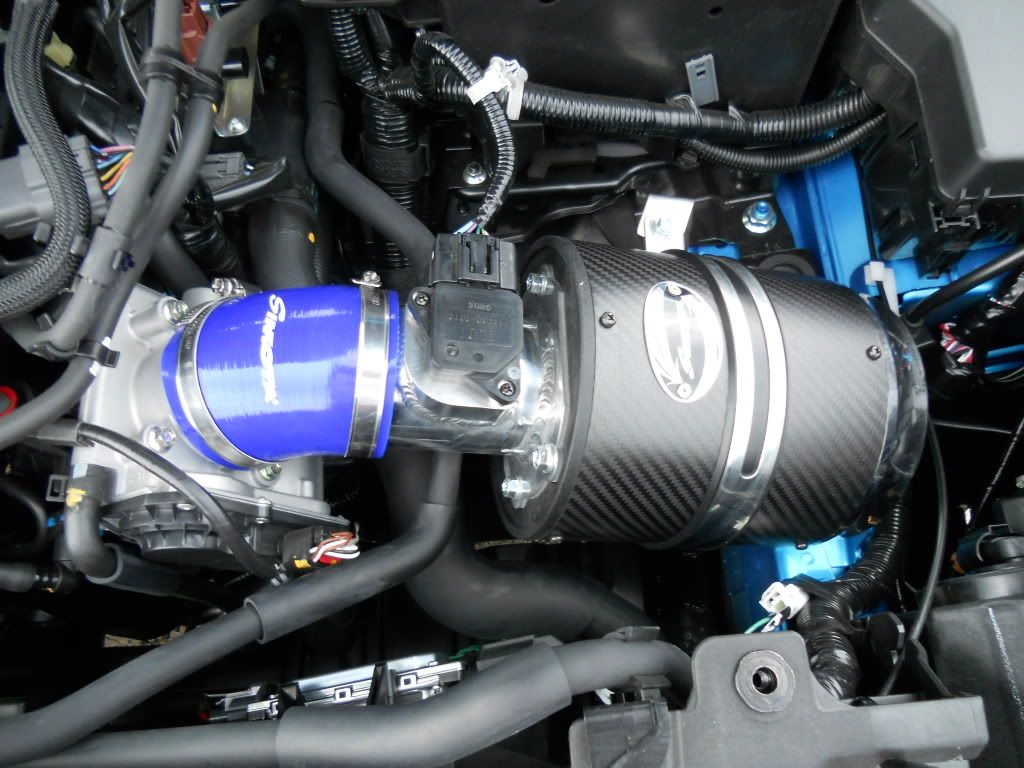
    So at this point you have something that looks like this:


    Off to the car.
    For this phase you will need a Phillips head screwdriver, socket wrench, and a set of needle nose pliers (if your hands are cold and can't pinch a plastic clip together).

    Just like any intake installation, you will need to disconnect the battery. The negative terminal is all that needs to be removed. For the 2010 there are two plastic clips that need to be snapped off. Then the top of the box slides right off (towards the front of the car). Then you simply use your socket wrench and loosen the bolt hold the negative battery terminal on.
    http://i628.photobucket.com/albums/u..._/PIC_0206.jpg
    http://i628.photobucket.com/albums/u..._/PIC_0207.jpg

    Now let's unhook some stuff. I started with the airflow sensor harness. Simply push down not the butt of it and wiggle it out.

    http://i628.photobucket.com/albums/u.../PIC_0208b.jpg

    Next we unhook the vacuum line. All you have to do is pull and twist.

    http://i628.photobucket.com/albums/u.../PIC_0211a.jpg

    Now the tranny clip screw is completely exposed, this holds the stock intake ducting to the throttle of the car. Unscrew this completely, but keep your eye and finger on the little square washer so it doesn't fall down into the engine bay, as you will need this if you ever revert back to stock.

    http://i628.photobucket.com/albums/u.../PIC_0211b.jpg

    Next just get your fingers between the rubber ducting and the throttle body and it will easily pull off. Follow this up by unhooking your air box lid. Only a couple reverse tension clips hold this on:


    As you are lifting the air box lid and ducting off there is a small clip holding the wiring for the airflow sensor to the box cover. ***This plastic clip is really lightweight and will break; mine did as it was 0 degrees Celsius today and plastic get pretty weak. Try and use your fingers or needle nose pliers to pinch it together and it will pop out.
    http://i628.photobucket.com/albums/u..._/PIC_0215.jpg

    Throw that ugly pink filter, with the rest of the removed parts (junk pile). Surprisingly it makes a really good seal in the stock airbox. For those that have never changed one, it just lifts out.
    http://i628.photobucket.com/albums/u..._/PIC_0216.jpg

    Let's get that bottom piece of the airbox out.
    So there is 1 bolt holding down the bottom of the airbox. It is a bitch to get out, I actually cracked a socket on it (it is the one with the red X through it). So instead I unbolted the circled one (but you will need to separate these two brackets as you need to have the one that is circled installed to brace your intake on).


    This next part is scary for someone that has never installed an intake before. The bottom of the airbox sits in, what are referred to as plunger clips. The 2010 uses two of these. All you have to do is get a hold of each side of the airbox and lift straight up (this is sturdy, so you can't break this). Plunger clip locations:

    http://i628.photobucket.com/albums/u..._/PIC_0219.jpg

    The only other thing to watch out for is the fresh air duct. This simply pulls apart, I highlight this with the green square.

    Unfortunately I didn't take a picture of the emptiness, but trust me there is a lot.

    On to the fun part.
    First there are a couple small maintenance things you could do to save a few minutes. Here you will only need a Phillips head screwdriver.

    The first is remove the air flow sensor from the stock intake. To do this you need to remove two screws. Then you install it in the Simota intake, the reverse way, you screw it in using two screws. *Please use the screws supplied by Simota.

    http://i628.photobucket.com/albums/u..._/PIC_0221.jpg
    http://i628.photobucket.com/albums/u..._/PIC_0222.jpg

    Second, do the breather filter. As funny as it is, this was the hardest part for me. Why? Because rubber and cold does not work to well. Remember the vacuum line we removed?


    Well we left it attached to the car, but now it is time to remove that as well. Trace it back to the back of the engine, it hooks to the valve cover. You will need to pull this off.


    So now you have that vacuum hose off. You need to remove the hard plastic piece from the rubber elbow, as you need this to reinstall on the car. This was the hard part as it was completely stuck together. After warming it up though, it came right apart.


    Now install your breather filter in the rubber elbow, and attach it to the original rubber elbow location.

    http://i628.photobucket.com/albums/u..._/PIC_0228.jpg

    Because I had you assemble the intake early, this step is easy. Install the intake onto the throttle body, using the second supplied tranny clip and you might as well plug back in the air flow sensor wiring harness.
    http://i628.photobucket.com/albums/u..._/PIC_0223.jpg
    http://i628.photobucket.com/albums/u..._/PIC_0224.jpg

    Guaranteed this has taken you around 20-30 minutes, you might as well hook the battery back up, and put the cover back on. This will help you get parts out of your way.


    Let's support it.
    Remember that bolt that I broke my cheap socket on. Go find that. During this step you will need a wrench. Once you find that bolt, it slides right out of the side of the lower stock airbox, but it is still attached to that black bracket I said we would need. So just unbolt that silver bolt with the rubber grommet on it from the black support.


    Reattach the black support to the car, using the stock bolt.


    Now carefully wrap the Simota supplied support bracket and rubber cushion around your Carbon Fiber filter cover, so that the bolt hole is near the support we just reinstalled. Use the supplied Simota bolt, I choose to go threads up and nut on top, just as it was a tight fit and would have been hard to put the threads down and the nut on the bottom (if your hand would have slipped it would have shot the nut down into the engine bay).


    There you are done. Enjoy. It looks pretty good in my opinion, I apparently did scratch it though, so that is why I said carefully wrap the support around it
    http://i628.photobucket.com/albums/u..._/PIC_0240.jpg
    http://i628.photobucket.com/albums/u..._/PIC_0241.jpg
    Last edited by WingZero_; 10-23-2009 at 11:39 PM.
    Mods: || Simota CBII-656 SRI || Racing Beat Axle-Back || Racing Beat RSB || 1.25" Drop Road Magnet || Yellow XPEL Fogs || JDM Goodie Axela Badge || TB Ground || NextMod Strut Tower Bar || EBay Eyelids || Hankook Ventus H105 Tires || Garage16.ca Vent Visors || Dupli-Color Red Calipers || Advance Timing Mod || License plate tint || TRZ Dog Bone RMM || JBR Short Shift Plate || JBR Base Bushings || MSDS Header

    Mazda3 Sound Clips

  2. #2
    Sr Member Thrizzl3's Avatar
    Join Date
    Jul 2008
    Age
    36
    Ride
    '18 Subaru WRX / '20 CX9
    Posts
    18,375
    Thanks
    430
    Thanked 500 Times in 260 Posts
    Mentioned
    265 Post(s)
    Tagged
    0 Thread(s)

    Default Re: INSTALL: Simota Carbon Charger for a 2010 Mazda 3 (2.5L engine)

    shouldn't this be in the how-to section?

  3. #3
    Moderator S.F.W.'s Avatar
    Join Date
    Oct 2004
    Location
    North York
    Age
    44
    Posts
    18,144
    Thanks
    963
    Thanked 1,401 Times in 741 Posts
    Mentioned
    416 Post(s)
    Tagged
    0 Thread(s)

    Default Re: INSTALL: Simota Carbon Charger for a 2010 Mazda 3 (2.5L engine)

    moved.
    2010 Black Mazdaspeed 3 - Lightly modded

  4. #4
    Jr Member WingZero_'s Avatar
    Join Date
    Aug 2005
    Posts
    467
    Thanks
    0
    Thanked 0 Times in 0 Posts
    Mentioned
    0 Post(s)
    Tagged
    0 Thread(s)

    Default Re: INSTALL: Simota Carbon Charger for a 2010 Mazda 3 (2.5L engine)

    Thanks.

  5. #5
    Jr Member WingZero_'s Avatar
    Join Date
    Aug 2005
    Posts
    467
    Thanks
    0
    Thanked 0 Times in 0 Posts
    Mentioned
    0 Post(s)
    Tagged
    0 Thread(s)

    Default Re: INSTALL: Simota Carbon Charger for a 2010 Mazda 3 (2.5L engine)

    Sound clip added: http://www.youtube.com/watch?v=9zmqHcTBrKE

    Like I said it just makes the car's sound deeper, and under heavy throttle it makes the VVT way more pronounced.
    Last edited by WingZero_; 10-25-2009 at 07:40 PM.

  6. #6
    Member mazdilla's Avatar
    Join Date
    Sep 2009
    Location
    Picton, ON
    Posts
    1,117
    Thanks
    0
    Thanked 2 Times in 1 Post
    Mentioned
    2 Post(s)
    Tagged
    0 Thread(s)

    Default Re: INSTALL: Simota Carbon Charger for a 2010 Mazda 3 (2.5L engine)

    Thanks for the tips.

    Installed mine today, however, I removed the entire OEM air intake system. Way cleaner look.

    Works great, sounds even better, no CEL's !

    Awesome!

    Thanks, NextMod!
    Mazda ... gone zoom zoom!
    2012 Tacoma TRD Sport DCLB 'Lifted'/ 2008 Ford Escape Limited
    P.S. Due to recent budget cuts and the rising cost of electricity, gas and oil, as well as current market conditions, 'The Light at the End of the Tunnel' has been turned off.

  7. #7
    Jr Member WingZero_'s Avatar
    Join Date
    Aug 2005
    Posts
    467
    Thanks
    0
    Thanked 0 Times in 0 Posts
    Mentioned
    0 Post(s)
    Tagged
    0 Thread(s)

    Default Re: INSTALL: Simota Carbon Charger for a 2010 Mazda 3 (2.5L engine)

    Congrats on the intake. Saw no reason to remove the fresh air intake tube, and still don't as it is just one less thing to have to put back in.

  8. #8
    Member mazdilla's Avatar
    Join Date
    Sep 2009
    Location
    Picton, ON
    Posts
    1,117
    Thanks
    0
    Thanked 2 Times in 1 Post
    Mentioned
    2 Post(s)
    Tagged
    0 Thread(s)

    Default Re: INSTALL: Simota Carbon Charger for a 2010 Mazda 3 (2.5L engine)

    Quote Originally Posted by WingZero_ View Post
    Congrats on the intake. Saw no reason to remove the fresh air intake tube, and still don't as it is just one less thing to have to put back in.
    Ya, but I'm anal.

    http://www.torontomazda3.ca/forum/sh...848#post592848

    I have no intentions of putting anything back - ever!

    Cheers!
    Last edited by mazdilla; 04-03-2010 at 11:24 PM.

  9. #9
    Jr Member WingZero_'s Avatar
    Join Date
    Aug 2005
    Posts
    467
    Thanks
    0
    Thanked 0 Times in 0 Posts
    Mentioned
    0 Post(s)
    Tagged
    0 Thread(s)

    Default Re: INSTALL: Simota Carbon Charger for a 2010 Mazda 3 (2.5L engine)

    My dealer is anal. What year is your car?

  10. #10
    Member mazdilla's Avatar
    Join Date
    Sep 2009
    Location
    Picton, ON
    Posts
    1,117
    Thanks
    0
    Thanked 2 Times in 1 Post
    Mentioned
    2 Post(s)
    Tagged
    0 Thread(s)

    Default Re: INSTALL: Simota Carbon Charger for a 2010 Mazda 3 (2.5L engine)

    Quote Originally Posted by WingZero_ View Post
    My dealer is anal. What year is your car?
    It's in the sig!

    2006 Mazda 3 GT Hatch - 68,000 kms - warranty still good to May 2011 or 'til it's miled out.

  11. #11
    Jr Member WingZero_'s Avatar
    Join Date
    Aug 2005
    Posts
    467
    Thanks
    0
    Thanked 0 Times in 0 Posts
    Mentioned
    0 Post(s)
    Tagged
    0 Thread(s)

    Default Re: INSTALL: Simota Carbon Charger for a 2010 Mazda 3 (2.5L engine)

    Oops. I knew it wasn't a 2010 as I could see the battery box vent tube opening.

    What's it sounds like WOT on the 2.3?

  12. #12
    Member mazdilla's Avatar
    Join Date
    Sep 2009
    Location
    Picton, ON
    Posts
    1,117
    Thanks
    0
    Thanked 2 Times in 1 Post
    Mentioned
    2 Post(s)
    Tagged
    0 Thread(s)

    Default Re: INSTALL: Simota Carbon Charger for a 2010 Mazda 3 (2.5L engine)

    Quote Originally Posted by WingZero_ View Post
    Oops. I knew it wasn't a 2010 as I could see the battery box vent tube opening.

    What's it sounds like WOT on the 2.3?
    It has a real throaty sound. I have no idea what a 2.0 sounds like.

    The closest I'll ever be to being part and parcel of a 2.0 is if it hits me.

  13. #13
    Newbie fu5ion's Avatar
    Join Date
    Dec 2009
    Age
    41
    Posts
    178
    Thanks
    0
    Thanked 0 Times in 0 Posts
    Mentioned
    0 Post(s)
    Tagged
    0 Thread(s)

    Default Re: INSTALL: Simota Carbon Charger for a 2010 Mazda 3 (2.5L engine)

    Zero,

    Thanks so much for posting this. I picked this up today from Peter. Still no codes and everything running good?

    What was your RPMS at in the video?
    _______________________________________________
    2012 Genesis Coupe 3.8GT - Karussel White

  14. #14
    Newbie fu5ion's Avatar
    Join Date
    Dec 2009
    Age
    41
    Posts
    178
    Thanks
    0
    Thanked 0 Times in 0 Posts
    Mentioned
    0 Post(s)
    Tagged
    0 Thread(s)

    Default Re: INSTALL: Simota Carbon Charger for a 2010 Mazda 3 (2.5L engine)

    Also Zero can I see a pic of your engine bay. I think I want to remove the entires system like mazdilla did.

    Thanks.

    Mark

  15. #15
    Jr Member WingZero_'s Avatar
    Join Date
    Aug 2005
    Posts
    467
    Thanks
    0
    Thanked 0 Times in 0 Posts
    Mentioned
    0 Post(s)
    Tagged
    0 Thread(s)

    Default Re: INSTALL: Simota Carbon Charger for a 2010 Mazda 3 (2.5L engine)

    No codes, everything works great. At most 5000 at 50%ish throttle, it is louder under a heavier load. Yeah i will get you a pic of the engine bay, everything is removed except for one pipe coming from the front of the car (no real reason to remove it). Keep in mind Mazdilla has a 1st gen and the equivalent pipe might be in the way on the previous gen.

  16. #16
    Jr Member WingZero_'s Avatar
    Join Date
    Aug 2005
    Posts
    467
    Thanks
    0
    Thanked 0 Times in 0 Posts
    Mentioned
    0 Post(s)
    Tagged
    0 Thread(s)

    Default Re: INSTALL: Simota Carbon Charger for a 2010 Mazda 3 (2.5L engine)

    The tube in the front with the flex piece in the middle is the only part I didn't remove as it is a PITA when you need to install the stock one again.


    Doesn't affect the looks of the intake.


    Engine bay pic, you don't see it. Also note, I have changed the location of the breather filter since the install, I just attached it to the end of the stock PCV tube, works better this way.

  17. #17
    Noob
    Join Date
    Apr 2010
    Posts
    8
    Thanks
    0
    Thanked 0 Times in 0 Posts
    Mentioned
    0 Post(s)
    Tagged
    0 Thread(s)

    Default Re: INSTALL: Simota Carbon Charger for a 2010 Mazda 3 (2.5L engine)

    I just installed this same intake thanks to your guide.

    Very easy step by step instructions. I'm not the most mechanically knowledgeable person out there, but i've done some work on cars before (my own brakes, alternator) with the help of others. But this was the first time ive done something completely on my own. Ya know what, it was very easy... except for putting that support bracket on at the end, what a bitch

    anyways, thanks for the awesome guide and pics. Car sounds nicer.

  18. #18
    Jr Member WingZero_'s Avatar
    Join Date
    Aug 2005
    Posts
    467
    Thanks
    0
    Thanked 0 Times in 0 Posts
    Mentioned
    0 Post(s)
    Tagged
    0 Thread(s)

    Default Re: INSTALL: Simota Carbon Charger for a 2010 Mazda 3 (2.5L engine)

    Yeah the support bracket can be a pain, there are two different versions of the bracket. One like the one I have, and one that hooks to a bolt underneath where the stock airbox was. Glad you found this useful. Feel free to post up any pics or any parts of the install you liked/disliked.

  19. #19
    Noob
    Join Date
    Jul 2010
    Posts
    3
    Thanks
    0
    Thanked 0 Times in 0 Posts
    Mentioned
    0 Post(s)
    Tagged
    0 Thread(s)

    Default Re: INSTALL: Simota Carbon Charger for a 2010 Mazda 3 (2.5L engine)

    Quote Originally Posted by phil05gx View Post
    shouldn't this be in the how-to section?
    I think yes. But it was already posted. It depends on moderator if it will remove it or not. But I think it is already here and I gain more information and idea of how to install mine either.

  20. #20
    Jr Member Roconne's Avatar
    Join Date
    Apr 2010
    Location
    Downtown
    Posts
    780
    Thanks
    0
    Thanked 0 Times in 0 Posts
    Mentioned
    0 Post(s)
    Tagged
    0 Thread(s)

    Default Re: INSTALL: Simota Carbon Charger for a 2010 Mazda 3 (2.5L engine)

    Thanks for the writeup WingZero. I got my Simota CBII SRI today and this guide helped out a lot in installing it.
    The instructions that come with it pretty much say 'Remove old air box. Install new SRI'.

    Did a quick test-drive and wow, this thing has a nice growl when you get going. Wasn't expecting it to be so loud, so that was a pleasant surprise.

  21. #21
    Jr Member
    Join Date
    Sep 2007
    Age
    39
    Posts
    337
    Thanks
    0
    Thanked 0 Times in 0 Posts
    Mentioned
    0 Post(s)
    Tagged
    0 Thread(s)

    Default Re: INSTALL: Simota Carbon Charger for a 2010 Mazda 3 (2.5L engine)

    Quote Originally Posted by WingZero_ View Post
    The tube in the front with the flex piece in the middle is the only part I didn't remove as it is a PITA when you need to install the stock one again.


    Doesn't affect the looks of the intake.


    Engine bay pic, you don't see it. Also note, I have changed the location of the breather filter since the install, I just attached it to the end of the stock PCV tube, works better this way.


    I don't understand why you put a breather on? The positive crankcase valve is supposed to take its air from the intake which applies a vaccum to the crankcase. The M3 crankcase is supposed to be sealed.
    Last edited by notoriousb; 01-04-2011 at 11:51 PM.
    ZooM-ZooM is the sound of money flying out of my wallet.

  22. #22
    Jr Member WingZero_'s Avatar
    Join Date
    Aug 2005
    Posts
    467
    Thanks
    0
    Thanked 0 Times in 0 Posts
    Mentioned
    0 Post(s)
    Tagged
    0 Thread(s)

    Default Re: INSTALL: Simota Carbon Charger for a 2010 Mazda 3 (2.5L engine)

    I put the breather on because there is no PCV vacuum hookup on the intake. A few intakes for the Mz3 (not M3) come with a breather filter.

  23. #23
    Sponsor - GTA Retrofits
    Hyperion's Avatar
    Join Date
    Dec 2010
    Location
    Richmond Hill
    Age
    34
    Posts
    5,855
    Thanks
    229
    Thanked 1,089 Times in 541 Posts
    Mentioned
    252 Post(s)
    Tagged
    1 Thread(s)

    Default Re: INSTALL: Simota Carbon Charger for a 2010 Mazda 3 (2.5L engine)

    Awesome write up, Used it for installing my Ractive.

    Took a picture of my "emptiness" if you want to use it
    Modifications? I've forgotten more than I remember. Click here for the list.

  24. #24
    Jr Member hyper7boy's Avatar
    Join Date
    Jul 2009
    Posts
    313
    Thanks
    0
    Thanked 5 Times in 2 Posts
    Mentioned
    1 Post(s)
    Tagged
    0 Thread(s)

    Default Re: INSTALL: Simota Carbon Charger for a 2010 Mazda 3 (2.5L engine)

    Hey are some pictures of when I had the Simota in my car. I HATED the intake bracket it came with so I went and made a new one at work in the summer. It worked really well! Looked clean, provide good support, etc. Recently I switched over to the AEM CAI which doesn't have as much of a growl when you step on it but it is definitely more effective that the Simota SRI.


    2010 Mazda 3 Sport GS - Celestial Blue
    ~6000K HID Kit~Sirius Sportser 5 Satellite Radio~Blue LED Dome Lights~Eibach Pro-Kits~Momo Shift Knob~White Emblems~Kenwood KAC-8105D~Kicker 12" CompVR~
    ~AEM Cold Air Intake~18" Enkei EKM3~6000K HID Fog Lights~Footwell lighting~Axela Badge~German Castrol Syntec 0W-30~Smoked LED Rear Reflectors~
    ~Graphite Grey Pearl Interior Trim~Alpine INA-W910 A/V Head Unit~Compustar RF-P2W901-SS~To Be Installed: Hella Horn's

  25. #25
    Noob royo's Avatar
    Join Date
    Aug 2008
    Posts
    18
    Thanks
    0
    Thanked 0 Times in 0 Posts
    Mentioned
    0 Post(s)
    Tagged
    0 Thread(s)

    Default Re: INSTALL: Simota Carbon Charger for a 2010 Mazda 3 (2.5L engine)

    It's that time of the year. I gotta clean out my filter. I was wondering if you guys have any idea how to clean the filter for these? Would a regular K&N filter cleaner and oil do?
    thanks

Page 1 of 2 12 LastLast

Similar Threads

  1. 2010 mazda 3 S grand touring edmunds review
    By mazdas3sporte in forum Mazda3 Reviews
    Replies: 41
    Last Post: 10-21-2009, 12:40 AM
  2. Official 2010 Mazda3 Specs & Features
    By Jeff-TheBiz in forum Mazda3 General Discussion
    Replies: 326
    Last Post: 09-18-2009, 01:08 AM
  3. 2010 Mazdaspeed 3 same engine?
    By Darkfrosty7 in forum Mazda3 General Discussion
    Replies: 7
    Last Post: 03-29-2009, 11:37 PM
  4. Soon to be a 3GT Owner
    By Fish in forum New User's Lounge
    Replies: 22
    Last Post: 07-14-2007, 09:25 AM
  5. 17 Mazda concepts from the Tokyo AutoSalon
    By ///M in forum Other Cars
    Replies: 25
    Last Post: 12-16-2005, 03:19 PM

Posting Permissions

  • You may not post new threads
  • You may not post replies
  • You may not post attachments
  • You may not edit your posts
  •