Page 1 of 3 123 LastLast
Results 1 to 25 of 74

Thread: How To: Install Angel Eyes (TM3 edition)

  1. #1
    Sr Member Gizzmo_jr's Avatar
    Join Date
    Mar 2007
    Posts
    3,322
    Thanks
    0
    Thanked 3 Times in 2 Posts
    Mentioned
    0 Post(s)
    Tagged
    0 Thread(s)

    Default How To: Install Angel Eyes (TM3 edition)

    Bumper
    1. Remove the 11 8mm (or phillips) screws on the bottom of the bumper.

    2. Remove the two big phillips screws by the hood latch
    3. Remove the two big plastic with rubber bumpers (use a small flat head to pop up the collar, then pull the entire thing out)

    4. Take off the two plastic phillips clips holding the mud shield back in the wheel well towards the front. (per side)

    5. Pull back the shield alittle and you'll see another 8mm screw by the bumper seam, take it off. (per side)

    6. Bumper is now free but still hanging in place. By the hood latch will be two big hooks that clip onto the sub frame. After you slightly pull these up the bumper is now in your hands.

    7. Remove the wiring for fog lights if applicable. And all other wiring. Set bumper aside.

    Headlight
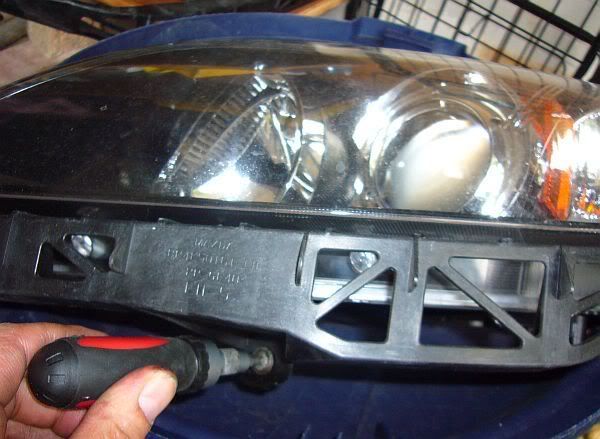
    8. There are 3 10mm bolts holding on the headlight. One is ontop quite visible. One right infront (bumper) inside the black thatched part on the bottom of the headlight. Another is off to the side.
    http://i8.photobucket.com/albums/a6/...Lremoval-1.jpg
    http://i8.photobucket.com/albums/a6/...Lremoval-2.jpg
    http://i8.photobucket.com/albums/a6/...Lremoval-3.jpg
    http://i8.photobucket.com/albums/a6/...Lremoval-4.jpg
    9. Pull towards the front (to clear the fender) and unclip the high/low beams and you can either unclip or remove the turn signal assembly (what I did, since its not halogen)

    Baking
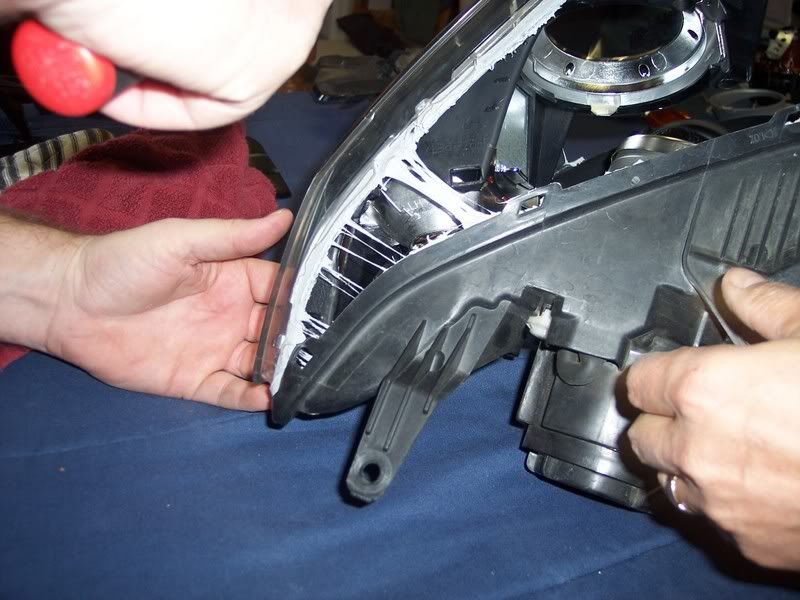
    10. Take off all 4 rubber vent lines off the headlight.
    11. Take off all the rubber surrounds where the lights plug in.
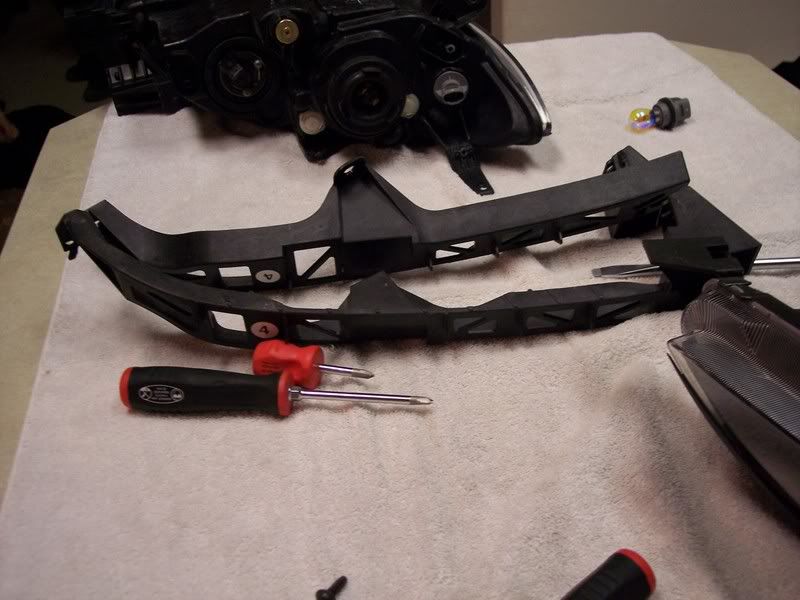
    12. On the bottom of the headlight assembly is a large plastic 'frame'. One phillips holds it on, then there are pressure clips on either side.


    13. Pre heat your oven to 200.
    14. Toss the headlight onto a baking sheet, and then into the oven. Make sure you HAVE the baking sheet, and that the light doesn't touch any of the sides of the oven if possible. If you can't close the door, that's ok. Mine worked just fine with the door open a crack.
    15. Wait 15minutes.
    16. MUCH MUCH easier with a friend, grab the headlight and work from the low beam side first. One person pull as another un-clips the clips with a flat head. Work 'semi' fast as the epoxy will start to cool and harden. Having a heat gun with you is beneficial in case.

    17. Remove the phillips screw holding the middle piece to the outside clear part.

    18. AVOID LIKE THE PLAGUE to touching the inside of the clear housing. Finger prints are your enemy.
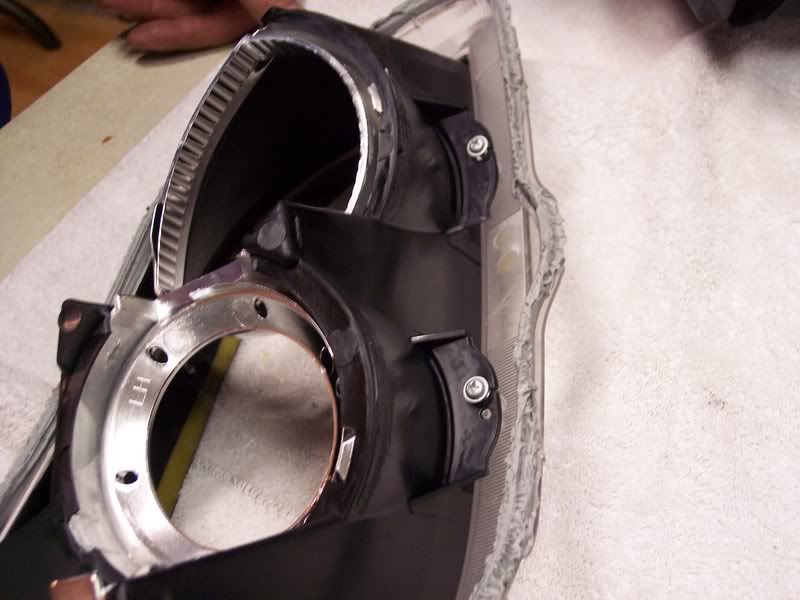
    19. Pop off the high/low chrome rings on the middle glossy part. Both are held in from the backside with plastic pressure clips.


    Angel Eyes
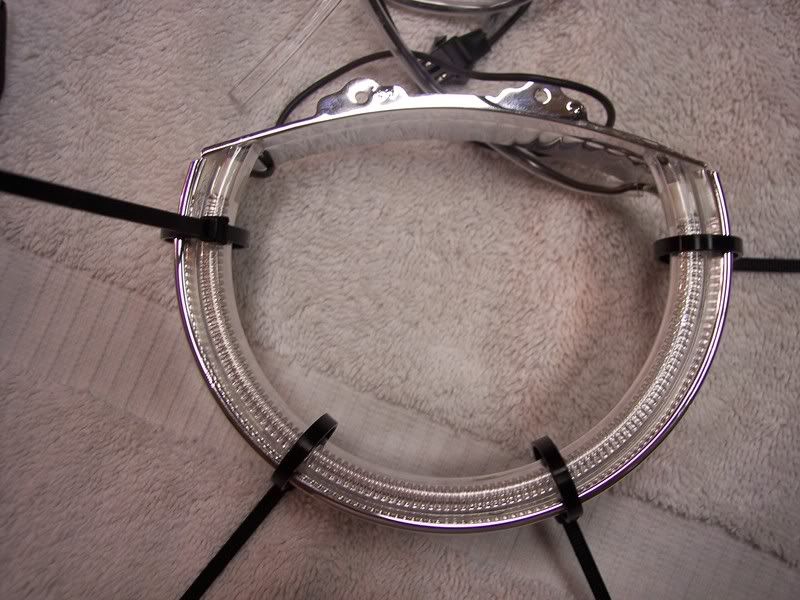
    20. Place the rings where you want them. The low beam is pretty obvious, but the high beam will seem it sticks out a little (thats ok). USE SILICONE AND NOT THE TAPE (clear drying kind. I used GE type2). Can't stress this enough, I've read peoples rings coming off cause the tape doesn't hold so save yourself the hassle please. Place a 1/8th inch bead where the ring will touch then use zip ties to hold it securely for about 30min. (silicone is tack-free in 30min, full cure in 24hours)

    21. Notch the spot where it's flat (between the high and low) to get the set of wires for the low beam to fit nicely.
    22. Pop both rings back onto the housing.
    23. Run the high beam ring wires in behind the high beam chrome housing and out where the rubber seal goes.
    24. Run the low beam ring wires in behind the low beam projector housing and out where the rubber seal goes.
    25. Clean off the chrome, black gloss, etc of all dirt and finger prints. Check 3 times cause it'll bug you to do this all over again.
    26. Attach the black middle piece to the outside clear part with the phillips.
    27. Set the two halves side by side relatively in place where they once were.
    28. Oven again for 15min at 200.
    29. Take out and press as hard as you can to fit the headlight into the grove. One corner goes in pretty deep, and catch all the clips if you can. If you hear popping thats good, your forcing out air bubbles in the epoxy.
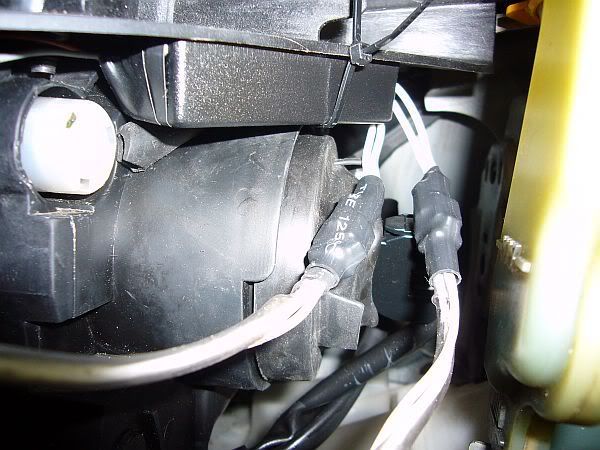
    30. (Optional) Apply a bead of silicone to the entire outside ring if you think the seal wasn't water proof.
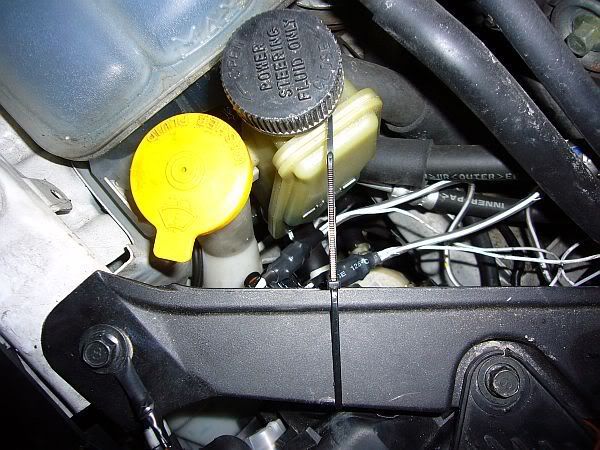
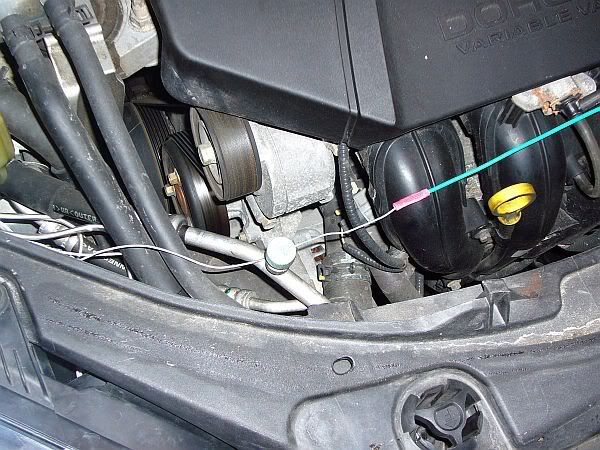
    Reinstall
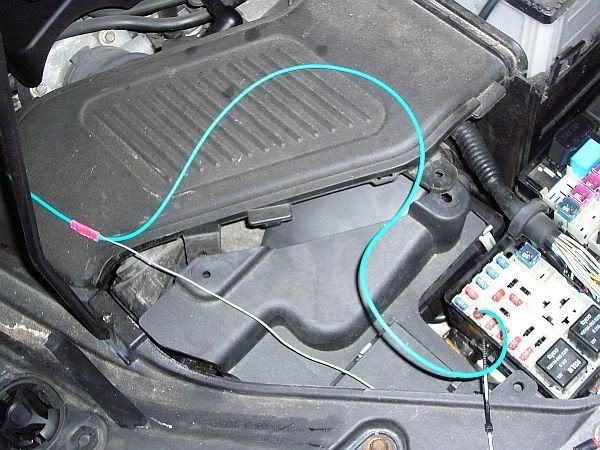
    31. Reinstall all rubber pieces, headlight bulbs, plastic frame bit.
    (Note, the angel eye wireing should come out beside the holes for the stock bulbs, so the rubber cap still works just as it's meant to.)

    32. Re installation of headlight is opposite to removal.
    33. Repeat other headlight.
    34. Re installation of bumper is opposite to removal. (Note, the mud guard on the car goes under and over along the bottom of the bumper. It's semi obvious how it goes together)
    35. Pray no screws left over.

    Wiring
    36. Assuming you already checked that they work. My procedure is without a wiring harness. Just a 12v and Ground per ballast.
    37. Secure the ballasts to the car using zip ties. Then connect the wires from the angel eyes (coming out of the headlights) to the ballasts.


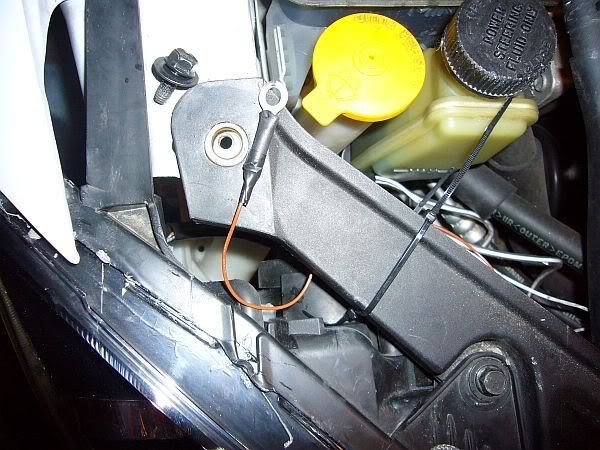
    38. Connect the ground to any local frame/metal/something bolt thus it will ground to the chassis/frame. I grounded it to the spot below. Make sure to ground it to a spot which touches a metal part of the car. You simply remove the screw, place the round connector around the screw and then screw it back in. I did this for each ballast.

    39. The next step was to connect the positive wires from each ballast together. Cut one piece of the wire which was long enough to span the entire width of the car from headlight to headlight and add a bit of length just in case. Run it along the radiator upper frame.


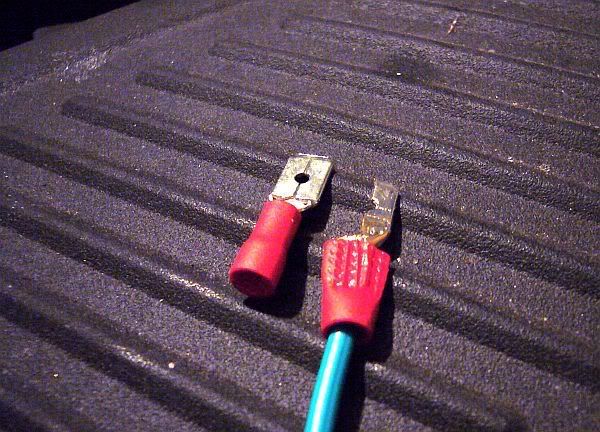
    40. Run the power wire to the top left empty fuse holder (when looking from the top, over the driver fender). Because of the size of the connector, you have to use scissors to cut a piece of the metal off so that it would fit properly in the fuse box. Start by cutting off only a small piece and then keep trimming it until it fit perfectly. Here is a picture of the original connector next to the cut one


    41. Suggested you put in a switch in the power wire, and an inline fuse holder (5A i'm told. They don't draw very much)
    42. Other suggestions would be wire into the fog light circuit or the running light circuit.
    43. Await night time and enjoy

    Took my post from another thread, and put it into the FAQ/tutorials section for easier finding. This is my TM3 edition because it's a full tutorial, not just headlight/bumper removal, just baking headlights, or just installing the angel eyes. Thus the words are my own, pictures taken from alternate sources.

    Please post up questions if you got them. Hope I can help.


    Threads pictures taken from (some)
    Link #1 : http://www.mazda3forums.com/index.ph...2207#msg612207 Thank you sok07 for permission to use the pictures.
    Link #2 : http://www.mazda3forums.com/index.php?topic=69613.0;all Thank you No Clue for permission to use the pictures
    Link #3 : http://www.torontomazda3.ca/forum/sh...8&postcount=27 Thank you rsquared for permission to use the pictures, and the addition to the "Wiring" section.
    Last edited by Gizzmo_jr; 06-20-2007 at 12:01 AM. Reason: Additions
    Diesel tractor...

  2. #2
    Member JPAV8S4U's Avatar
    Join Date
    Jul 2005
    Age
    46
    Posts
    1,715
    Thanks
    0
    Thanked 1 Time in 1 Post
    Mentioned
    1 Post(s)
    Tagged
    0 Thread(s)

    Default Re: How To: Install Angel Eyes (TM3 edition)

    Very nice! good write up Gizzmo! You make it look easy.... I aint touching this job with a ten foot pole though!
    2013-AudiTTS-Ibis White-Stage 2+ APR

  3. #3
    Member Caz's Avatar
    Join Date
    Oct 2005
    Age
    49
    Posts
    1,789
    Thanks
    0
    Thanked 0 Times in 0 Posts
    Mentioned
    0 Post(s)
    Tagged
    0 Thread(s)

    Default Re: How To: Install Angel Eyes (TM3 edition)

    Nice job on the write up.
    2006 Mazda3 Sport GT - Snowflake Pearl White - Luxury Package
    2006 Mazda Tribute GS-V6 - Light Silver Metallic

  4. #4
    Sr Member 3GFX's Avatar
    Join Date
    Jun 2006
    Age
    39
    Posts
    8,191
    Thanks
    9
    Thanked 10 Times in 6 Posts
    Mentioned
    1 Post(s)
    Tagged
    0 Thread(s)

    Default Re: How To: Install Angel Eyes (TM3 edition)

    Nice write up!
    - - - - - - | NOW | 08' VW Jetta 2.0T | - - - - - - - | BEFORE | 04' Mazda 3 GT/GFX | - - - - - -

  5. #5
    Member WhiteSpeed3's Avatar
    Join Date
    May 2005
    Age
    38
    Posts
    2,001
    Thanks
    0
    Thanked 0 Times in 0 Posts
    Mentioned
    0 Post(s)
    Tagged
    0 Thread(s)

    Default Re: How To: Install Angel Eyes (TM3 edition)

    if it is the same kit for the speed does anyone wanna do it for me ill even pay them

  6. #6
    Sr Member Gizzmo_jr's Avatar
    Join Date
    Mar 2007
    Posts
    3,322
    Thanks
    0
    Thanked 3 Times in 2 Posts
    Mentioned
    0 Post(s)
    Tagged
    0 Thread(s)

    Default Re: How To: Install Angel Eyes (TM3 edition)

    IIRC the "Mazda 3 Angel Eye kit" will fit fine on any hatch/sedan/speed. The housing itself and sizing is unchanged between all of them.

  7. #7
    Banned
    Join Date
    Oct 2004
    Location
    GTA
    Ride
    Mazdaspeed6
    Posts
    5,068
    Thanks
    0
    Thanked 0 Times in 0 Posts
    Mentioned
    2 Post(s)
    Tagged
    0 Thread(s)

    Default Re: How To: Install Angel Eyes (TM3 edition)

    fark i wanna do that to my speed i have the kit just lazy

  8. #8
    Sr Member Gizzmo_jr's Avatar
    Join Date
    Mar 2007
    Posts
    3,322
    Thanks
    0
    Thanked 3 Times in 2 Posts
    Mentioned
    0 Post(s)
    Tagged
    0 Thread(s)

    Default Re: How To: Install Angel Eyes (TM3 edition)

    Quote Originally Posted by Mazdaspeed View Post
    fark i wanna do that to my speed i have the kit just lazy
    Expect a good 6 hours at best. Just waiting time for cooking/silicone is one hour (15+15+30) per headlight.

  9. #9
    Resident Deal Provider, UnHaggle Rep, CarCostCanada, EasyCarDiscount
    Jeff-TheBiz's Avatar
    Join Date
    Apr 2005
    Location
    Mazda of Toronto
    Ride
    2017 CX-5 GT w/ Tech
    Posts
    8,882
    Thanks
    116
    Thanked 216 Times in 115 Posts
    Mentioned
    117 Post(s)
    Tagged
    0 Thread(s)

    Default Re: How To: Install Angel Eyes (TM3 edition)

    Quote Originally Posted by Gizzmo_jr View Post
    Expect a good 6 hours at best. Just waiting time for cooking/silicone is one hour (15+15+30) per headlight.
    Took me a month... meh..
    Damn you photobucket.....

  10. #10
    Sr Member 3GFX's Avatar
    Join Date
    Jun 2006
    Age
    39
    Posts
    8,191
    Thanks
    9
    Thanked 10 Times in 6 Posts
    Mentioned
    1 Post(s)
    Tagged
    0 Thread(s)

    Default Re: How To: Install Angel Eyes (TM3 edition)

    The baking is what totally turns me off. There are so many other mods to do first!

  11. #11
    Sr Member Unoriginalusername's Avatar
    Join Date
    Mar 2007
    Posts
    5,621
    Thanks
    0
    Thanked 19 Times in 10 Posts
    Mentioned
    3 Post(s)
    Tagged
    0 Thread(s)

    Default Re: How To: Install Angel Eyes (TM3 edition)

    cool but scary

  12. #12
    Member JPAV8S4U's Avatar
    Join Date
    Jul 2005
    Age
    46
    Posts
    1,715
    Thanks
    0
    Thanked 1 Time in 1 Post
    Mentioned
    1 Post(s)
    Tagged
    0 Thread(s)

    Default Re: How To: Install Angel Eyes (TM3 edition)

    If this is a mod you truly want to do to your car..... Then go to lockdown and pay the 200 to have it done for you.. Liability on someone else....

  13. #13
    Sr Member dentinger's Avatar
    Join Date
    May 2007
    Location
    Edmonton, AB
    Age
    37
    Posts
    6,754
    Thanks
    35
    Thanked 222 Times in 150 Posts
    Mentioned
    12 Post(s)
    Tagged
    0 Thread(s)

    Default Re: How To: Install Angel Eyes (TM3 edition)

    im thinking of doing this to my car...
    BUT if i did, id buy a new set of headlights, and install the angle eyes on them.
    that way i dont have to have my bumper removed until everything gets done...
    but thats in the future..... maybe next summer if me and my friend ever get really bored... and i have extra cash on hand....

    oh, and great write up! i'll def use it if i ever install angle eyes on my car!

  14. #14
    Member MattC's Avatar
    Join Date
    Oct 2006
    Age
    40
    Posts
    1,616
    Thanks
    0
    Thanked 0 Times in 0 Posts
    Mentioned
    0 Post(s)
    Tagged
    0 Thread(s)

    Default Re: How To: Install Angel Eyes (TM3 edition)

    I think I might do this one later in the summer.

    the only thing I am ancy about is the wiring. which is strange, cause youd think putting headlights in your oven would be the scary part.
    '03 VW GTI - Silverstone Grey

  15. #15
    Member WeatherB's Avatar
    Join Date
    Apr 2007
    Posts
    1,439
    Thanks
    0
    Thanked 0 Times in 0 Posts
    Mentioned
    0 Post(s)
    Tagged
    0 Thread(s)

    Default Re: How To: Install Angel Eyes (TM3 edition)

    Hey Gizzmo,

    Couple of questions for you... How did you achieve a nice clean silicon job? I am concerned about the portion which is shown when you open the hood.

    Also, did you silicon the openings on the ballast or the connections?

    Finally, in terms of attaching the angel eyes, I used epoxy for my low-beams before deciding to use silicon. Do you think they'll fall off come winter time?

    P.S. 200 degrees did nothing for me. I had to boost up the temperature to 230 before I was able to take the capsule apart.

  16. #16
    Sr Member Gizzmo_jr's Avatar
    Join Date
    Mar 2007
    Posts
    3,322
    Thanks
    0
    Thanked 3 Times in 2 Posts
    Mentioned
    0 Post(s)
    Tagged
    0 Thread(s)

    Default Re: How To: Install Angel Eyes (TM3 edition)

    1.
    Silicone around the outside of the headlight housing? I didn't need to put any, haven't had fogging issues. Yet...*knocks on wood*

    2.
    Devin's kit comes with heatshrink that goes over the connections between angel eye and ballast. What openings you speaking of?

    3.
    Epoxy will work just fine, if anything alittle over kill in terms of strength in the bond. Come winter you won't have any problems.

    4.
    I guess it's different from oven to oven. Old versus new. Did you preheat?

  17. #17
    Member WeatherB's Avatar
    Join Date
    Apr 2007
    Posts
    1,439
    Thanks
    0
    Thanked 0 Times in 0 Posts
    Mentioned
    0 Post(s)
    Tagged
    0 Thread(s)

    Default Re: How To: Install Angel Eyes (TM3 edition)

    Thanks Gizzmo.

    1. I wanted to play it safe and decided to silicon the outside of the capsule. I thought it was going to be completely hidden. I didn't bother to double check.

    2. Devin's kit did come with some heatshrink for the connections, but where the wires come out of the ballast, I see some gaps. It must be sealed from the inside, or at least I hope.

    3. Perfect. I prefer over-kill then under-kill.

    4. Our oven is one of the new digital types, I even tried 30 minutes at 200degrees. Still nothing. I preheated. Perhaps it was because I used a baking pan and some aluminum foil.

  18. #18
    Sr Member Gizzmo_jr's Avatar
    Join Date
    Mar 2007
    Posts
    3,322
    Thanks
    0
    Thanked 3 Times in 2 Posts
    Mentioned
    0 Post(s)
    Tagged
    0 Thread(s)

    Default Re: How To: Install Angel Eyes (TM3 edition)

    Ah I know what your talking about now in the gaps. Okay, I had this too but I thought it was because I pulled to hard on the wires during installation. Basically I could see the metal in the wires directly (~1mm) from the ballats (power/ground wires). SO I took some silicone, like your suggestion, and touched it up. To answer your question properly now, yes I'd recommend it.

  19. #19
    Member WeatherB's Avatar
    Join Date
    Apr 2007
    Posts
    1,439
    Thanks
    0
    Thanked 0 Times in 0 Posts
    Mentioned
    0 Post(s)
    Tagged
    0 Thread(s)

    Default Re: How To: Install Angel Eyes (TM3 edition)

    Thanks. I just siliconed them.

    Surprisingly, one of my ballast wires were also frayed, about 1mm from the opening. Maybe a defect with the manufacturing process?

  20. #20
    *burp* bubba1983's Avatar
    Join Date
    Sep 2004
    Age
    42
    Posts
    10,290
    Thanks
    2
    Thanked 262 Times in 157 Posts
    Mentioned
    90 Post(s)
    Tagged
    0 Thread(s)

    Default Re: How To: Install Angel Eyes (TM3 edition)

    currently following this walk thru at the moment, as i need to rebake my one light, so far so good, at the oven stage now!
    Adam - Kitchener, Ontario.
    Far Far West O'l G! Proud Owner of the Whop-Toboggan Rice Bomb!


  21. #21
    Sr Member Gizzmo_jr's Avatar
    Join Date
    Mar 2007
    Posts
    3,322
    Thanks
    0
    Thanked 3 Times in 2 Posts
    Mentioned
    0 Post(s)
    Tagged
    0 Thread(s)

    Default Re: How To: Install Angel Eyes (TM3 edition)

    Let me know if there are required additions/changes or notes to be mentioned.

  22. #22
    *burp* bubba1983's Avatar
    Join Date
    Sep 2004
    Age
    42
    Posts
    10,290
    Thanks
    2
    Thanked 262 Times in 157 Posts
    Mentioned
    90 Post(s)
    Tagged
    0 Thread(s)

    Default Re: How To: Install Angel Eyes (TM3 edition)

    jus came out of the oven, the light, literally, in no word of a lie, came apart in 2 seconds. jus needed a screwdriver to looken up the one end, and it practically fell apart, woohoo!!!

  23. #23
    Newbie
    Join Date
    Sep 2006
    Posts
    230
    Thanks
    0
    Thanked 0 Times in 0 Posts
    Mentioned
    0 Post(s)
    Tagged
    0 Thread(s)

    Default Re: How To: Install Angel Eyes (TM3 edition)

    great writeup! took me 10hrs roughly when i did this mod, cuz i was with a friend and baking the housing at his oven, but it got a little burn smells so his parent didnt allow us to continue to re-bake it to close the housing
    we had to drive around to find another oven at midnight LOL

  24. #24
    Jr Member dr1ft3r's Avatar
    Join Date
    May 2007
    Posts
    596
    Thanks
    0
    Thanked 0 Times in 0 Posts
    Mentioned
    0 Post(s)
    Tagged
    0 Thread(s)

    Default Re: How To: Install Angel Eyes (TM3 edition)

    Quote Originally Posted by dentinger View Post
    im thinking of doing this to my car...
    BUT if i did, id buy a new set of headlights, and install the angle eyes on them.
    that way i dont have to have my bumper removed until everything gets done...
    but thats in the future..... maybe next summer if me and my friend ever get really bored... and i have extra cash on hand....

    oh, and great write up! i'll def use it if i ever install angle eyes on my car!

    I agree. Are there headlights with angel eyes already installed for sale? I don't like the idea of spending that much money and thent having to do all that labour. Great write-up btw.

    07mica||Prolumens|CompustarPro|Lids|oemFogs||want2buy|Rims|Grill|Prokits||Spoiler|

  25. #25
    Sr Member Gizzmo_jr's Avatar
    Join Date
    Mar 2007
    Posts
    3,322
    Thanks
    0
    Thanked 3 Times in 2 Posts
    Mentioned
    0 Post(s)
    Tagged
    0 Thread(s)

    Default Re: How To: Install Angel Eyes (TM3 edition)

    So that knock on wood didn't work. As of last week I started having fogging issues on the drivers side. It was only after a wash and didn't last long. I popped out the turn signal, took off the top most vent pipe and waited 30min in the sun.

    My fix was a bead of silicone on the top of the headlight, the part you see when you pop the hood. It helped, but I finished fixing it last night. The hole was in that last 3inches where the fender hangs over.

Page 1 of 3 123 LastLast

Posting Permissions

  • You may not post new threads
  • You may not post replies
  • You may not post attachments
  • You may not edit your posts
  •