Someone on the M3F suggested that we purchase a "tube" of the stock glue to use while reassembling.
Anyone know where we can get our hands on it?
If we can get some, it should just be a matter of add some more during re-seal.


Someone on the M3F suggested that we purchase a "tube" of the stock glue to use while reassembling.
Anyone know where we can get our hands on it?
If we can get some, it should just be a matter of add some more during re-seal.

Well thanks to Gizzmo and many others, I finally got around to this install! I'm not going to do a complete write up since most things are covered in the original post, but I'll add some info and photos on some things, in particular on the wiring, which was the toughest part for me since I am (er was) a wiring newbie!
Perhaps Gizzmo can add some of this to the first post:
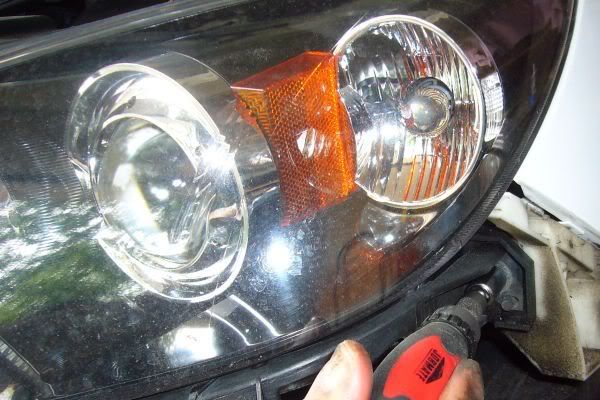
Removal of headlights from car after bumper removal:
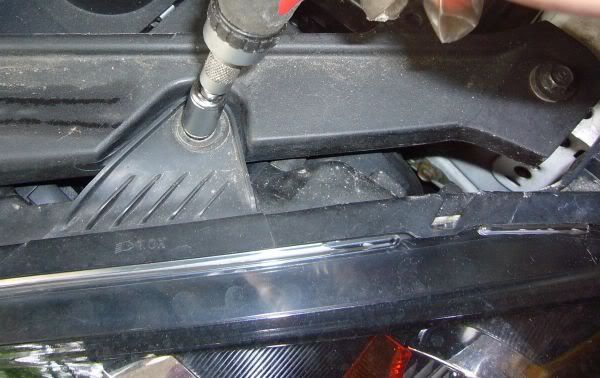
There is 4 screws to remove.
Screw #1 removed using a screwdriver (screw is held in by a plastic fastener, be careful to keep everything in a safe place where they won't get lost!):
Screw #2 removed using a socket wrench
Screw #3 removed using a socket wrench
Screw #4 removed using a socket wrench
Once you remove the screws you simply pull it off the car. Make sure you remove and 3 light bulbs/wires from the headlight (low beam, high beam and turn signal) before removing the headlight. To remove the bulbs simply twist them and then pull them out.
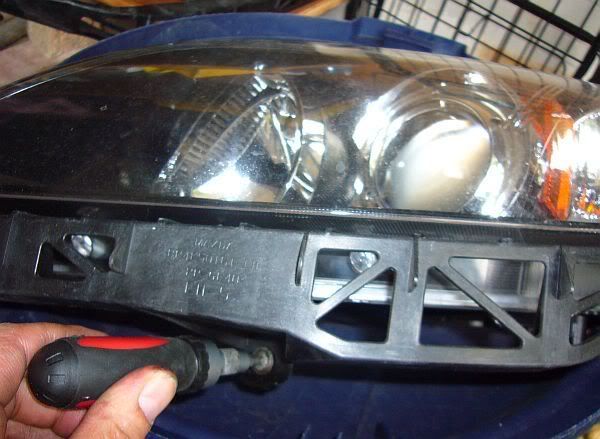
Once you have the headlight removed you will have to remove the bracket at the bottom before taking apart the housing. There's only one screw holding it in, as shown below:
Wiring:
I wired my angel eyes straight to the fuse box so they are on whenever I turn on the car. They stay on for a few seconds after the car is turned off.
Tools and materials I bought/used:
1) 10 feet of 22AWG car wire (Active Surplus - downtown Toronto) approx $5
2) Pack of butt end connectors (Canadian Tire) approx $2
3) Pack of grounding connectors (Canadian Tire) approx $2
4) Power connector (Active Surplus - downtown Toronto) approx 15 cents each
5) Lock wrench (already had)
6) Wire stripper/cutter (Active Surplus - downtown Toronto) approx $5
7) Roll of electrical tape (already had)
8) Pack of zip ties (Active Surplus - downtown Toronto) approx $5
9) Heavy duty scissors (that can cut metal, which I already had)
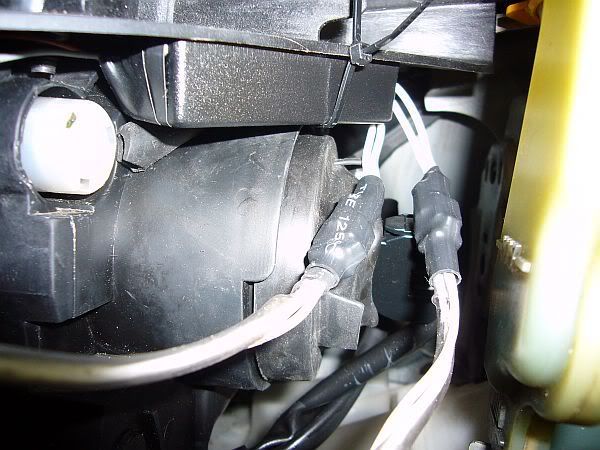
The first thing I did was to secure the ballasts to the car using zip ties. I then connected the wires from the angel eyes (coming out of the headlights) to the ballasts.
Here is a top view of the ballast secured:
Here is an inside view:
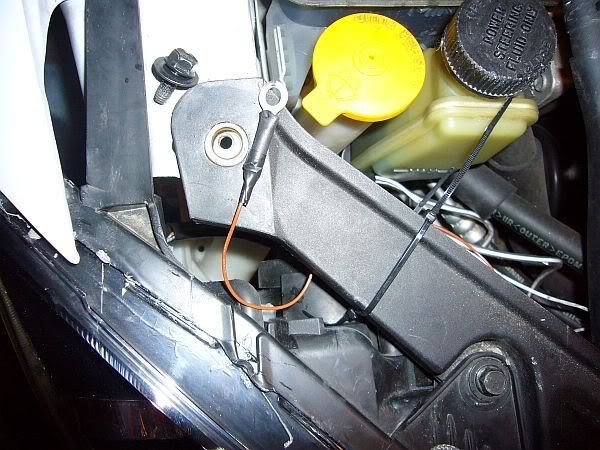
The next step was to ground the (brown) negative wires. I stripped the wire using the wire stripper (but I'm sure you can do it by simply using scicssors). I then attached a circular connector (make sure to get the right size which will fit the width of the screw) and then crimped it on and taped it up with electrical tape. I grounded it to the spot below. Make sure to ground it to a spot which touches a metal part of the car. You simply remove the screw, place the round connector around the screw and then screw it back in. I did this for each ballast.
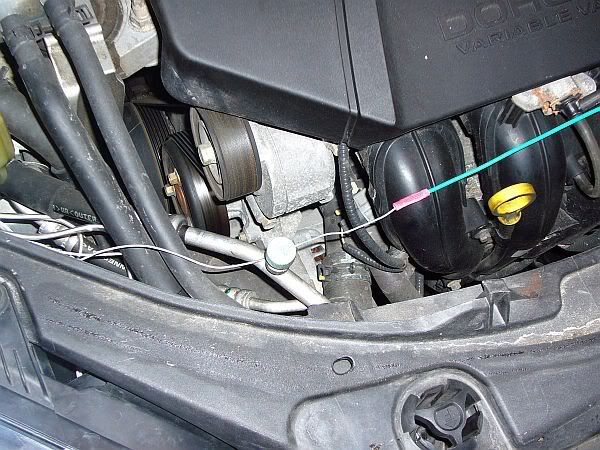
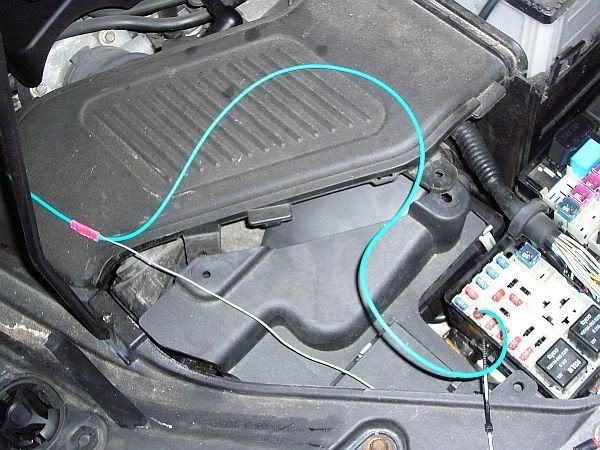
The next step was to connect the positive wires from each ballast together. I cut one piece of the wire I bought which was long enough to span the entire width of the car from headlight to headlight and also added a bit of length just in case. I stripped all the end of the positive wires and long piece of wire. Then I used a butt end connector to make the connections. Simply insert the exposed wire on each side into the connector and then crimp using the lock wrench. See below for a pic of the positive ballast wire connected to the long wire (green):
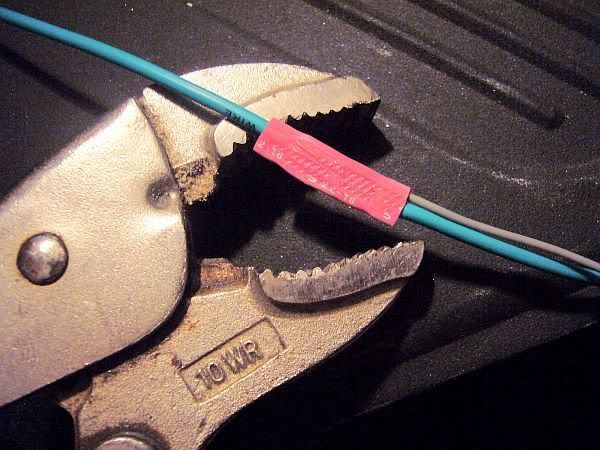
For the right side connection I also had to add another piece of wire which would be used to "power" the angel eyes via the fuse box. So, using a butt end connector once again, I inserted the exposed wire from the green long wire into the left end, but on the right end I inserted both the positive ballast wire and the "power" wire. I then crimped all 3 together, as shown below:
Here's a wider view of this (with the power wire already inserted in the fuse box):
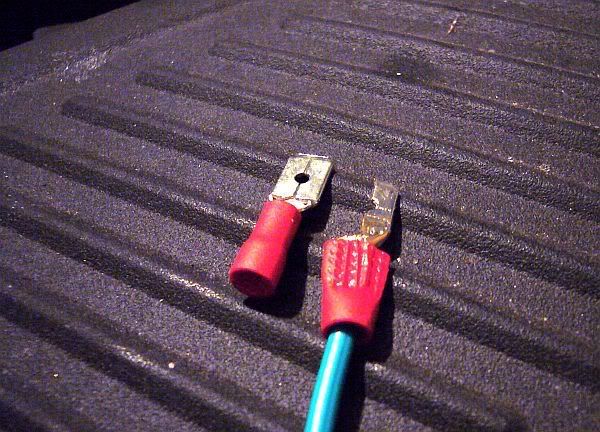
The next step would be to add the proper connector to the "power" wire which will then be inserted to the fuse box. Crimp the exposed wire to the connector. Then, because of the size of the connector, I had to use scissors to cut a piece of the metal off so that it would fit properly in the fuse box. I started cutting off only a small piece and then kept trimming it until it fit perfectly. Here is a pic of the original connector next to the cut one:
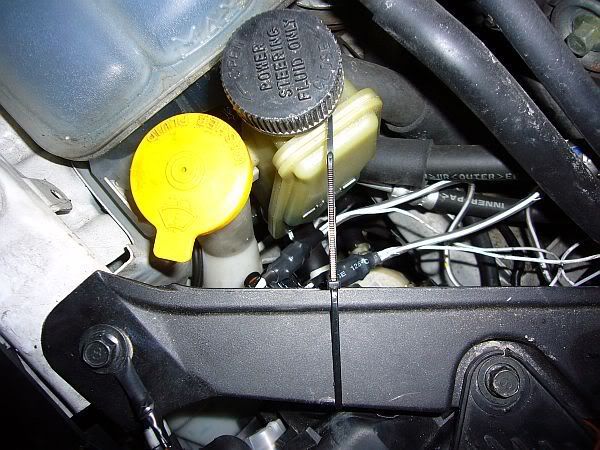
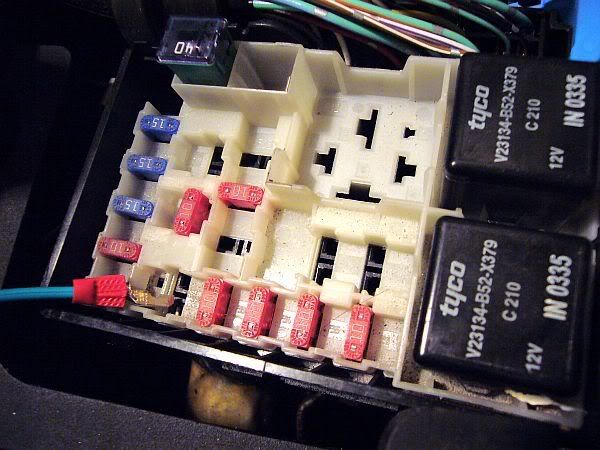
Then, go ahead and insert the power wire/connector into the following empty slot in the fusebox:
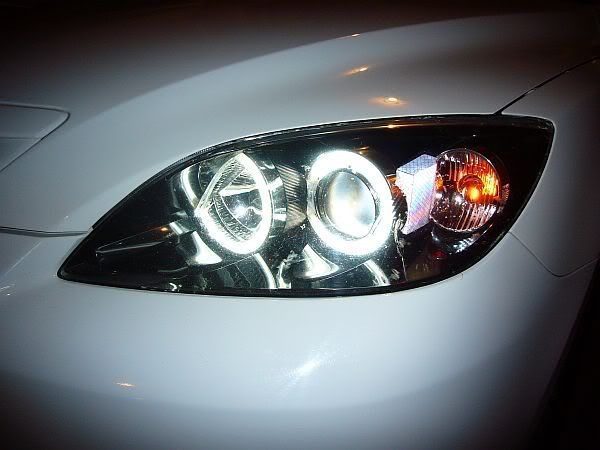
Then cross yur fingers, test it out, turn on the ignition and voila! Sorry for the bad pic, bad lighting in my garage
After I made sure to cover all connectors with electrical tape. Also, I used zip ties to secure the wire running along the car. There a few holes along the black piece ( I think 3 in all) which will allow you to hold this in place.
Overall, this was a gruelling, yet quite satisfying mod. I bought an extra set of headlight housings so I was able to open them up to install the angel eyes in the housings one day, and then do the bumper removal, headlight uninstall, reinstall and wiring on another day.
Now everytime I see those angel eyes shining I'm very proud I was able to do this myself. I actually bought the angel eyes last fall and only installed them now.
It's only thanks to people like Gizzmo and numerous others that I was finally able to get the courage to do this. Thanks again to everyone and I hope my small contribution can help others as well!
Hi,
Looks good. I like the idea of grounding each ballast separately. I made the mistake of running two wires across the engine compartment.
Two suggestions. You might want to silicon the connections between the ballast and angel eyes. Also, add in a fuse between the fuse box and ballast connection. 5A should do.
Thanks for the suggestions WeatherB! For the additional silicone, do you mean on the actual ballast were the wires come out, or where the wires from the angel eyes attach to the wires from the ballast? If it's the second one, it already has a heatshrink material on it to secure the connection, do you think silicone is still necessary?
For adding in the fuse, what exactly is the purpose, and how would I got about doing it? What does the fuse look like?
Hey. For added safety, you should silicon both places. Both Gizmo and I have done that. You have to keep in mind that you're talking about 20,000volts. The slightest amount of moisture will short out the ballast.
For the fuse, go to Walmart and pick up a pack of 5A mini-fuses. They are $3.97 for 5 of them. Then cut the wire you ran from the fuse box in half. Connect up the fuse in-between the wire you just cut.
The purpose of the fuse is that if anything shorts out, the fuse will burn out preventing damage to the car. I'm not sure whether the area in the fuse box that we are tapping into is already fuse-protected or not.

Congrats buddy, happy everything worked out for you. Your setup is identical to mine in terms of wiring. With your permission I'll append to my first post and give full credits.
Diesel tractor...

so far no condensation for me after a wash already...miust say im proud of myself, and thankfull for the walkthru!
Adam - Kitchener, Ontario.
Far Far West O'l G! Proud Owner of the Whop-Toboggan Rice Bomb!
Permission grantedOriginally Posted by Gizzmo_jr

. I wouldn't have it any other way! This is a daunting mod, so I'm up for anything we can do to make it easier for others!
bubba, same for me, but that's with me washing it. I'm scared for the winter when I have to go through a car wash, that will be the real test!
for sure...but, it takes a whole of what? 15in to whip off the headlights? since w both have 2 pairs, thats what i may do this winter, whip them off and put them back on in the spring again
ive been thru 2 winters with my old setup, no problems
Okay rsquared, done and done. I had to URL tag 4 of the pictures since there is a 20 image limit per post.
Hey Gizzmo, did you have any luck removing the clips for the fog light wires? Both times that I've removed the bumper, I've been unable to figure out how to get them out.
These are the white clips which hold the fog light wiring to the bumper.
OMG NO !!! Faking annoying thou cause I wanted to get the bumper away from the car, not sit beside it bumping (bad pun) into stuff. I "think" they are like the one time "zip-tie" style clips.
Or you talking about the actual power plug's themselves for the fog lights? I can get those off, not the harness that goes to the car.
Phew. I thought it was only my incompetence. hehe
I'm tempted to just cut them and use zip ties next time. It's very annoying for sure.

is there a specific kit i should buy to do this mod or is any of the kits on ebay ok

Get it from Devin...$80bucks for the Angel eyes kit. www.thexenonstore.com

yea. i went to go order some yesterday, but he said he's out of them for the next 2 weeks.
with that being said, im installing angel eyes on my car in 2 weeks!! yay!
hopefully all goes well. also, i want to use the angel eyes as my dtrl, cuz that looks so good!!
2007 Mazda3 gx
2003 Volkswagen GTI 20th Anniversary Edition
2010 Kawasaki Ninja 250R
2011 Dodge Ram 1500 Outdoorsman / 2012 Ducati Monster 796
practise makes perfect. i can whip the bumper and one headlight off now in like 7min flat! hahahah
finally makin the upgrade from 2 years of thinlines, to chromiums now!! today is install day, or attempted install day!! once again , refrencing to this how to!

I want to have eyes, but I dont want them to be automatic with my lights.
I want to be able to turn them on and off at will.
here is what I was thinking: Hook the lights up to something with a good output, say the cig lighter or dome light. keep all the wiring inside the car, just run the necessary wires out into the engine compartment. Use a inline fuse, hook it up to a custom switch somewhere.
anyone see any possible issues with this?
'03 VW GTI - Silverstone Grey
My set up is power is from the fuse box (live only when car is on or accessory mode). Wire into the cabin, through a switch, and to ground. I control when their on, with the assurance that I can't kill my battery.
I want to see your setup before I do mine I think, My fusebox is currently full of shit from my independant fog mod... it was a clean mod too.
any chance you can take a shot of your fusebox as it currently is setup?
You can also tie them into your independent fog lights and run both off the fog light switch.
mine are hooked up to a dedicated switch also. Can't rememebr how lockdown wired it, but i can turn them off and on wiht a switch whenever i want
Splice right into the same top left plug as the independent fog light mod. (viewing from over the drivers fender)
not a bad idea hooking them up to the fogs, that way you dont need an extra switch.
I just run my fogs all the time, so i would have to turn them off when i turn my HID's on!
Go for it! u wont regret it....unless u screw up something majorly
 Posting Permissions

 Reply With Quote